The purpose of a Checklist in Ascora is to provide high-level workflow guidance to Users. Checklists consist of a series of steps which must be undertaken or considered before a Quote or a Job can be finalised.
1. Hover the mouse pointer over the Advanced Icon in the Top Menu and choose Checklists from the dropdown list. The Checklist list will display.
2. To create a new Checklist, click the +Add New button.
3. The Add New Check List pop-up window will display. Enter a name for the new Checklist and click the Save button.
4. The Checklist Details screen will display. Add an Item to the Checklist by clicking the New Item button. Type the Item Description into the text-box then click the Update button to save the Item. Repeat this process to add all the Items you require to be included in the Checklist.
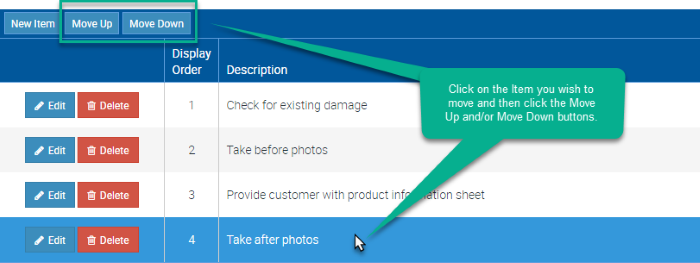
5. To change the order of Items in the Checklist, click on the Item you wish to move and then click either the Move Up or Move Down buttons until the Item is in the correct location in the Checklist.
6. When ready, click the Save button. Your Checklist is now available to add to a Quote or a Job.
How to Set up a Default Checklist per Job Type
You can set up a default checklist per job type and can also do the same for quotes.
1. Go to Administration → Jobs.
2. Click Edit beside the Job name where you want to set up a default checklist.
In this example, we are setting up a default checklist for job type called Building Maintenance.
3. In the field Default Job Checklist, click the arrow and in this example, we select the checklist called Maintenance - Jobs.
Once ready to proceed, click the Save button located on the lower right part of the box.
Note: You can create checklists by going to Advanced → Checklists → Add New.


